Monday, November 18, 2019

Launch Techniques


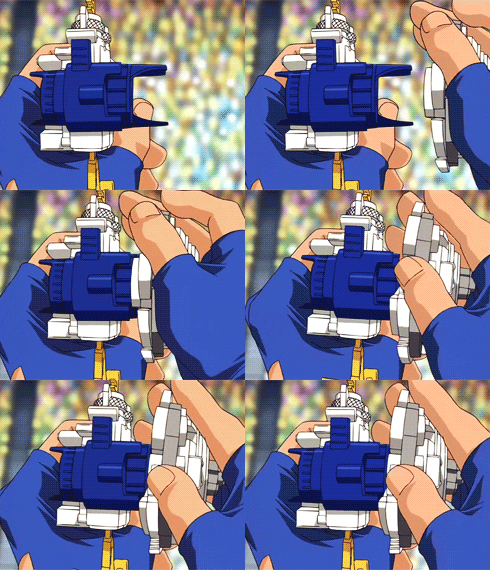
Even with some inaccuracies in the show, I appreciate the time put in to display two fundamental aspects...

Beyblade Beyblade Burst GIF - Beyblade BeybladeBurst GIFs
Power and Style

Launch techniques are another fundamental aspect of the game, though it's normally overlooked by casual players or spectators. To further add to the game's versatility, you need to decide and use a launch that works best either for your bey and/or for dealing with your opponent. Being the other factor you can directly control during a battle, one should put in some time to understand how each launch technique works, and how to perform them yourselves when the time comes. 

So with that, let's start breaking them down, shall we? Before we start, please note that the techniques I'll describe here are generally for standard stadiums, and they may not be able to work in stadiums with gimmick designs. Additionally, when I mention holding a launcher, holding a grip attached to the launcher is an interchangeable term as well.


- Standard Launch

This is the go-to launch when starting off and learning how to play the game. Generally, the hand that holds the launcher is held over the stadium at an angle parallel to the center of the stadium floor and doesn't move from its position as the cord is pulled. This causes the bey to drop to the center of the stadium before going into the general movement pattern caused by the tip. You can change up the launch by pulling harder or more softly to increase/decrease spin power respectively. 

Increasing power will give the bey more stamina and movement while decreasing power can soften the impact of attacks and restrict movement, which also reduces the chance that your bey bursts. While it's a solid launch, your bey is somewhat open to attacks as a result of being in the center, so you can mix it up by aiming for different spots in the stadium. In general, this launch is recommended for beys that have limited movement, such as defense and stamina types, to maximize endurance.


- Banking Launch

The banking launch works like the standard launch with a catch. You still have a stable grip on your launcher as you pull the cord, but you now "bank" the launch by holding it at an angle where the bey is parallel to the slope of the stadium instead of its center. 

Since the performance tip now lines up with the stadium slope your bey will have a wider range of movement around the stadium before it becomes upright or loses enough spin to return to its standard movement. While this launch can be used for beys with stable performance tips to dodge or initiate some attacks on their own, this launch greatly benefits beys with more movement such as attack types, as the movement allows for attacks to better target the center instead of just riding around the outside of the stadium. 

You can also use it on other types in an attempt to avoid attack patterns. The wider movements do take some stamina away as a result, but altering the initial movement pattern of your bey can aid in using the remaining stamina to maximize the other aspects of your bey. In addition to practicing banking, I'd suggest trying out other angles to see what else may work for your beys.


- Catapult Launch

This launch starts in the same position as the standard launch, but as the name suggests, the bey is "catapulted" into the stadium by pushing  the launcher forward at the same time as you pull the cord back when launching.  This generates more power than the standard launch to further increase stamina, and the force can also allow for a strong opening attack. However, it's difficult to use initially as the power comes at the cost of some control and accuracy. If launching straight out be careful so that you don't hit your opponent or another object. 

This launch benefits any bey as the stamina is increased, but the greater amount of rotations can leave it vulnerable to recoil, and beys with more mobile tips may have a harder time remaining in the stadium. Since it may also divert from the normal movement pattern due to inertia from the launch, consider using it with tips that have smaller ranges of movement for more control. Practice keeping the launch within the stadium without a bey attached at first, and also have an idea in mind of where you want your bey to land in the stadium to adjust before you launch.


-Sliding/Rush Launch

This launch combines utilizes both aspects of banking and catapulting into one launch technique, which is popular among competitive players and has gained more notice due to it being featured in the Beyblade Burst anime series. To start, have your launcher held in a banking position parallel to and targeted at the stadium slope. Then, launch from that position via catapulting your bey

This results in the movement shifting at the start to continuously move to and from the center in a flower pattern (as the small circular movements resemble the petals around a flower's pistil) for mobile beys. Because of that, this technique is recommended for beys with more movement, especially attack types as you get the extra power from catapulting, with less stamina wasted since banking the launch lets you get more attacks on the center initially. To practice the launch I'd suggest starting with catapulting practice to get your launch under control, and then adding banking to work on developing the desired effect.


-Bank Down Launch

This is a variant of the sliding/rush launch where your launcher is angled further down from the normal banking angle, where it's a bit closer to being launched vertically against the stadium. Like the previous launch, this is done while catapulting and has nearly the same results as a sliding/rush launch. By angling the launcher further down it's easier to perform than the previous technique since the angle is tilted further decreasing the chance of correcting the launch to be parallel to the center of the stadium. 

However the impact of the launch from catapulting takes the endurance benefit that's normally granted as a result, making the technique weaker than the sliding/rush launch. It also leaves some tips prone to breaking from the impact as well, so I wouldn't recommend using it aside from as practice to ease into learning the sliding/rush launch.


- Flash Launch

This launch is like the bank down launch without catapulting. By setting your launcher at an angle past the regular one for banking, the launch sends your bey to the center and then has it perform its regular movement pattern. This is also recommended mainly for attack types, specifically in attack vs attack battles as your bey will be in the center and then catch the opponent spinning around the ridge of the stadium, giving you an opportunity for an over or burst finish.


- Snipe Launch

This launch doesn't focus directly on any traits of the previous techniques, but rather requires timing. First, you have to guess or figure out where your opponent is aiming for their bey. Then, within the allowed time of launching you delay your own launch slightly aiming at that spot to hit their bey with your own either in mid-air or just as they hit the stadium. 

The direct attack can give you an edge or decide the match when performed correctly. It's recommended to use the catapult technique with this launch for the extra power. Since this technique doesn't necessarily rely on specific traits or parts from your bey, you can use it with any type, but you should consider your own bey's burst resistance and points of recoil against theirs as well.


- Conclusion

Overall, there are various techniques that you can use to give yourself an edge in the game, and it's up to you to figure out what you should do to make the most of them in conjunction with your bey.

I also recommend checking out this video that provides some visuals and another explanation for each launch: https://www.youtube.com/watch?v=TCrDJFh1ivM&t

Some things you can consider when deciding on a launch:

How likely is it for my bey to burst in this battle?
What type am I up against?

Where will my opponent aim?
How will my opponent's bey move?
What will my opponent's bey do to win?

Also take note that in a match with multiple rounds, you might not be able to rely on the same launch in each round as you and your opponent use info from previous rounds to decide what to do in the current one. It may be possible to take some wins with one solid launch, but it's better to be well versed in various launches to prepare for more situations. Hopefully, this guide gives you some insight to further improve your launches and adds another aspect to mess around within the game.
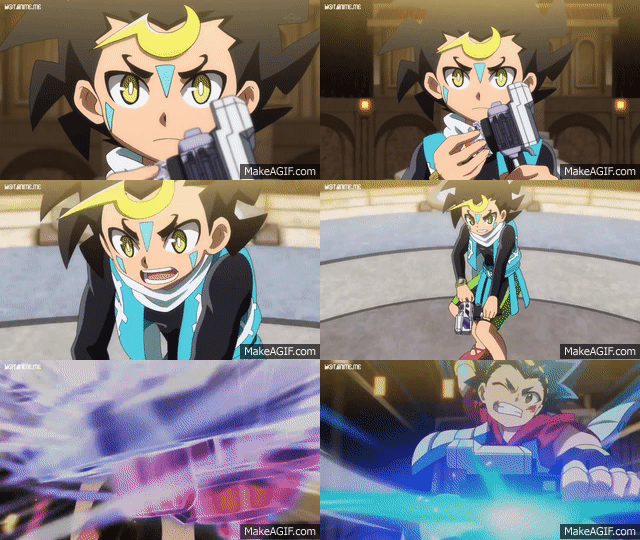


Image result for beyblade burst gif launch
Hopefully people don't injure themselves trying this IRL...
                                                            

Monday, November 4, 2019

Beyblade Types


Attack, Defense, Stamina and Balance...

Captain Planet GIF - Captain Planet GIFs
I am an organized type chart!
 
Now that I've gone through an overview to help you decide on a launcher, let's go over another fundamental part of the game, beyblade customization. One of the game's most appealing aspects is that bladers are able to mix and match parts to make many different kinds of beys for various purposes in battle.

 Given all of the options we have with parts, beyblades usually fall under four different classifications or "types" that describe general playstyles. For bladers of previous generations, the type system hasn't really changed from Metal Fight and the original series' toylines, though now the burst finish is another factor to consider when building your beys. 

Other various factors considered when deciding what type your bey is are things like weight, movement patterns, and spin time, though not every condition has to be met for their label. For now we'll take a look at the common traits each type has, their strengths and weaknesses and how they fare against other types, and also use stock examples that represent these various traits fairly well. Hopefully by the end of this you are able to better understand how each type works and can have a better idea of what to consider when customizing for and playing with each type.


Attack

Image 1

Let's start off with the most popular type, attack. This type is usually the most recognizable due to the dynamic movement inside the stadium. It's also used by almost every protagonist across the different incarnations of the anime series. The goal of an attack-type is to use great force to overpower opposing beys, hitting hard, fast, and consistently enough to end games with over/burst finishes.

The movement comes from using a performance tip with a flat base. This generates friction to move around the stadium, building momentum for their attacks. The layer will have various ridges/protrusions to control where/how force is applied when making contact, and the disk may also distribute weight to match the contact points on the layer. 

The overall weight is average or light when compared to other types, heavy enough to reduce the impact of recoil on itself while being light enough to reduce pressure on the driver to allow for more movement.

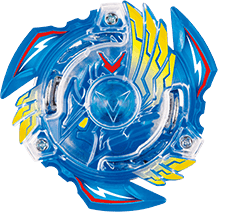
Victory Valkyrie/Valtryek V2 is one example of what attack-types can be like. It has various edges on the layer to direct how it's force is applied, the disk while light, is designed to push air downwards initially to have more force on impact (though in practice it's unable to do so), and the rubber driver adds on to friction for speed in exchange for a low spin-time, and gets faster with use since the spikes wear down and create a flatter and faster tip.

Attack-types have the lowest spin-times due to using a less stationary performance tip, while the uneven weight distribution also doesn't help keep the bey upright as it starts to slow down. This can be taken advantage of if the attack type fails to land hits on the opponent. Movement can also be hard to control with the driver making it vulnerable to over finishes as well. 


                                                                                                       Defense


On the opposite end of the spectrum, defense-types are intended to hold up against the best features of an attack-type, minimizing the damage taken from attacks while also being able to spin longer and wait for the opponent to wear down. One core aspect is that these beys are heavyweights, to have resistance against recoil.

The performance tips have moderate movement with ball shapes or wide cones, giving enough stamina to outlast attack-types while also enabling  movement for counterattacks or to dodge incoming attacks. The disk is designed to distribute weight more evenly and along with the layer, adds the most weight to the bey. The Layer is designed to be somewhat rounded to reduce recoil, but some ridges are included to enable counterattacks. 

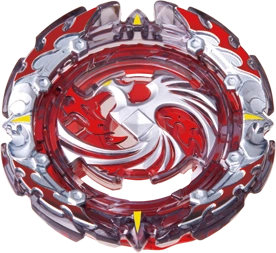
An example of a good defense-type be would be Dead/Dread Phoenix 0 Atomic. The layer is much rounder compared to an attack-type and features a gimmick where the outer armor can fall of instead of having the beyblade burst from an initial hard impact, allowing the remaining bey to be even rounder while conserving stamina. 0 is a fairly heavy disc that distributes weight evenly to further help with defensive properties, and the Atomic driver is a free-spinning ball to aid with stamina while allowing for moderate movement.
                                                                                          
While it's designed to have more stamina than attack-types, defense-types don't have the most stamina as the weight puts pressure on the driver, and the components are not oriented to make the bey spin as long as possible. 

Stamina


Official Image
Since spin-time is an aspect fairly important to the game, it makes sense that there's an entire type dedicated to it. Stamina-types really only have one goal, spin for as long as possible and win the match with a spin finish.

The performance tip will have a pointed tip, either breaking into the wider cone or having a thinner design. This is done to minimize friction against the stadium by limiting how much contact is made while spinning and to decrease movement in order to conserve spin.

 The disc will distribute weight evenly, and alongside the layer will have average weight to further limit friction on the performance tip, but have enough weight to handle some recoil. The layers will also be very rounded or have a design intended to further extend spin-time. The parts may also work together to enable Life-After-Death (LAD), where the bey is able to generate extra rotations after it has lost stamina and fallen on its side.

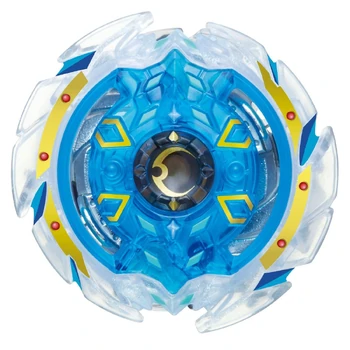
Deep Chaos/Caynox C3 4 Flow Bearing serves as a good example. The layer's shape helps to maintain stamina and the sloped ridges provide minor defense, 4 is a lighter weight that reduces pressure/friction, and bearing's free rotating tip along with its use of ball bearings helps to greatly increase the spin time.

While they spin fairly long, since friction is minimized and the design has less defense/offense to extend spin time, they are prone to taking more damage from beys that can generate recoil. They also make easy targets since they generally stay in the center of the stadium where they will move the least. 
                                                                                                    BalanceOfficial Image


Following the main three types, Balance is unique in the sense that it's a combination of the types mentioned above. With a balance type, you use parts that combine traits from two or all three of the other types and use their synergies to create a jack-of-all-trades of sorts. 

Due to their nature it's hard to pinpoint specific aspects of what classifies them, since the parts you want to use depending on what types you want to borrow from. 

For attack traits, I recommend looking for layers that apply recoil, or drivers with a flat tip. For defense traits, heavier disks or layers that reduce the impact of recoil. For stamina traits, use more stable drivers or smooth and round layers to more evenly distribute weight.

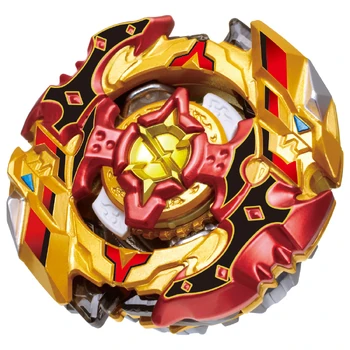
Cho-Z Spriggan/Turbo Spryzen 0Wall Zeta' is able to use traits of all 3 types fairly well. The layer while corrugated is still rounded and has rubber to take hits and metal to dish out attacks. It can also alter between left and right rotation for further variation. 0 is a fairly heavy disc with the wall frame adding to the weight as well. Zeta' allows you to choose between a flat attack tip, a ball defense tip, and a sharp stamina tip to suit your matchups, while the stronger spring makes it harder to burst.

Using balance-types, one should be careful as the various traits implemented may not mesh well, resulting in a bey that is unable to do well in any aspect. While they are versatile, Balance-types are also masters of none, since having to use various traits means there's no one area it shines in. As such they are less likely to win against beys that take advantage of the types they've tried to implement, or beys that are clearly focused on one type. Overall, to use multiple traits the bey sacrifices the ability to be strong in one area, relying on its versatility to win.

Specialist


Image 1The last category I'll include is not officially recognized, but I think it's distinct enough to mention. Simply put, the specialist type is one used for beys that don't really fit within the other four categories. 

I think of it as the opposite of a balance type. While the balance-type wants to use various traits from the other three types, a Specialist goes against all other types in favor of focusing on one specific aspect that isn't labeled by the other three categories. While the balance-type is a jack-of-all-trades, specialists are one-trick-ponies.

 This can be a mechanic or gimmick that it chooses to build around and focus on for its strategy. However in a similar manner to balance types, the limit to building this kind of bey depends on what aspect you want to go for. It can include parts from the other types, but the main focus should be on what you want to specialize in. There's also a risk to building these beys since you may be lacking or forced to give up an aspect that's normally included by nature of being within the four more defined types.

Wizard Fafnir Ratchet Rise Sen is one example, where even though it's been officially labeled a stamina type, I feel it belongs in the specialist category. The wizard layer and ratchet disk use rubber and a plastic ring respectively, in order to absorb spin from right-spin beys, while the rise performance tip helps keep the bey upright to further enable spin stealing.

Due to their nature, specialists will be favored to win matches that they are designed to take advantage of, or that you've learned how to prepare for from experience. On the other hand they are also favored to lose match-ups that abuse their weaknesses, or where their weaknesses can be learned and taken advantage of. For example with Wizard Fafnir, the sen weight makes the bey somewhat unbalanced, and the ample amount of rubber used increases recoil and by extension, the chances for a self-caused over or burst finish as a result.

                                              
                                               ConclusionGiven all the types, a chart that organizes them looks something like this:          


Attack, Defense and Stamina are arranged in a fashion similar to rock, paper, scissors, considering their pros and cons. Balance is in the center and Specialist is outside the main four, fitting of their traits. A summary of each:

Attack: Uses high movement and recoil to win. Has advantage against Stamina-types since there's less resistance to their attacks, and the limited movement lets them set up easier. Disadvantaged against Defense-types due to the heavier weight, lower recoil, and moderate movement to avoid attacks.

Defense: Uses heavier weight and lower recoil to reduce the impact of attacks while maintaining some stamina. Has an advantage against Attack-types due to holding out against their attacks. Disadvantaged against Stamina-Types since their own stamina isn't maxed out.

- Stamina: Uses moderate weight alongside other parts to maximize spin times. Has an advantage against Defense-types since there's less of a chance to prevent an endurance battle. Disadvantaged against Attack-types since there's less resistance to an over or burst finish.

Balance: Uses parts to have traits from the aforementioned types in order to win through versatility. Advantage/Disadvantage depends on what traits are built upon, though it may also lose due to not being overly strong in one area.

Specialist: Uses parts to ignore strategies from other types and focus on a more specific/unique aspect of the game to win. Advantage/Disadvantage depends on how much the opposing bey plays into/against your specifications.

While there's still the possibility of some beys performing better than others, with how much one can customize there's no such thing as a perfect bey. It's up to you to find what combinations suit you and how to adapt your strategy to account for their weaknesses, or the opponent's strengths.


Saturday, October 26, 2019

The Launcher


So before we get further into the spin tops themselves, let's discuss something that doesn't get as much focus when discussing the game, your launcher and launch. While it's true that a large portion of interest in the game comes from customization and figuring out what kind of bey suits you, finding your preferred launcher and knowing what each launch variation is just as important if not more important, since having both will increase the chance that your bey performs the way you want it to.


Fashion Design GIF
Who doesn't enjoy a good lock?


In Beyblade Burst we can break up launchers into three major categories: light launchers, beylaunchers, and gimmick launchers. Each one can suit various needs, and while older versions may be outclassed in their various category or overall seem under-performing, I wouldn't say there is a "best launcher," as every blader will have preferences on what works best for them. I'll be going through some general pros and cons for each type so that when you're done, you can have a better idea of what launcher you'd like to use in the future.

Light Launcher
Image result for light launcher lr
Light Launcher LR (TT)


Let's start off with the Light Launcher. This launcher uses a winder with teeth that, when inserted into the main part that attaches to your bey, lines up with a gear on the inside which will rotate the prongs, and by extension your beyblade when it is attached. 

These launchers generally have less power in comparison to other launchers due to being lightweight, but as a result this also means they're generally easier to aim with. It also can't be set up in multiple configurations when attached to a launcher grip, and the launcher on its own may be quite small to hold for some bladers. 

For the Takara Tomy line, some sets also provide slightly longer or thicker winders to give you an extra power boost while still maintaining high accuracy. As an additional tip, the winder is normally curved from packaging, but this can be fixed by running it under hot water while straightening it, then using cool water to affix it in that position. For both TT and Hasbro any light launcher works, though for convenience you might want one that launches beys in both rotations. Hasbro's supergrip launcher also seems to do well as more stability is added to your launch.


                                                                                                                                             Beylauncher


Image result for dual threat launcher hasbro
Dual Threat Launcher (Hasbro)

 Following that, we have the Beylauncher. Instead of using a traditional winder, the beylauncher uses a string attached to a set of gears that is attached to the prongs, which is pulled to launch the beyblade. The set of gears then wind the string up to be reused again. This is generally the most popular launcher as the use of the string allows a blader to launch harder and faster compared to the light launcher. 

This initially comes at a trade for accuracy, but his can be fixed over time as you learn to use it. The LR launchers may also feel bulky for some to use. Some beylaunchers again have a longer string if you want more power. Some also have a tendency to either break or have the string caught up with extended use, but generally the string can be fixed at the least.

You can also delay or prevent this from happening by releasing the string just as it runs out of length, to avoid tugging the gear to its breaking point. From TT, again a LR beylauncher is good for ease of use, and the long versions of each seem to be the go to for most bladers. From Hasbro, the dual threat and master kit launcher are good options as the former has LR versatility, while the latter has a longer grip.


Gimmick Launchers
Image result for sword launcher and digital sword launcher
Digital(Left) and Regular Swordlaunchers (TT)

The last section of launchers are what I'll call gimmick launchers. While they could fit in other categories, as the name suggests a gimmick is implemented to change how the bey is launched. Some use a button to give the bey a set number of rotations, some use a unique winder/string and design to improve the power of a launch, and some may have a gauge to let you see how strong your launch is. 


Generally I wouldn't recommend these launchers, save for the sword/digital swordlaunchers. Launchers that require you to push a button will only allow you to give the same amount of spin each time to your beyblade, when changing how much you give can affect how the results of a battle turn out.

Some gimmicks are also faulty, and the nature of the design means you may not be able to customize it with other parts to suit your needs. I do recommend the sword launcher options as they're essentially a light launcher with a grip and stiffer winder, letting you get more power when compared to the regular launcher. This does come at the cost of the accuracy when first figuring out how to use one, and the digital sword launcher in particular has locking issues when attaching to beyblades with certain disks or layers, and the tendency to skip teeth.


Going over again with a brief summary of each:
  • Light Launcher
    Pros: Ease of use, better initial accuracy, least likely to have issues in the future
    Cons: Less initial power, inconvenient to hold/use on a grip for some bladers
    Recommended Items: Takara Tomy LR Light Launcher and Long Winder, Hasbro Supergrip Launcher

  • Beylauncher 
      Pros: More power, convenience of using string, multiple variations to hold/attach to a grip              
    Cons: Less initial accuracy, may break down/have string issues, may feel bulky
  Recommended Items: Takara Tomy Long Beylauncher of variety that suits you (Standard, L, LR), Hasbro Masterkit or Dual Threat Launcher


  • Gimmick Launcher      
          Pros/Cons: No grip compatibility, less of a learning curve to get used to launching, gimmicks can be hit or miss
          Recommended Items: Hasbro and Takara Tomy Swordlaunchers


Overall there are a lot of launchers that have various benefits and downsides, but it's up to you to find one that compliments how you beyblade. While I have my recommendations, you might have your own preferences and that's completely fine, you find what works best for you. Hopefully this guide can provide some insight for those who need a little help deciding on which launcher to use.

Tuesday, October 22, 2019

How to Play


Greetings bladers, welcome back to Beysics. Today I'll be doing an overview of the setup for Beyblade Burst parts as well as going over the current rules for the game. Beyblade's main concepts haven't really changed over the years, but the systems have become very diverse from when it originally started. 

From the Spin Gear to the Synchrome system, the improvement of parts allowed for more dynamic game play and customization to enhance the experience. Within the burst system alone there are fours subsystems that have been released, six if you additionally count Hasbro's systems. Each one adds a little more to the customization aspect with more parts while also improving the quality of the beys by building off of or outclassing previous subsystems. The Burst System can be broken down into three general parts:

The Layer: This is the main contact point of the bey and where the prongs are inserted. It also determines if your bey will spin to the right (Clockwise), left (Counter-clockwise), or in some occasions, both directions. The underside of the layer has a section in the middle for the driver to attach to, which is then twisted along with the forge disc in order to put the beyblade together. While Hasbro has made their undersides smooth, Takara Tomy layers have protrusions or "teeth" that contribute to how tightly the bey comes together when assembled, and layers can have different types of teeth depending on your preferences.

The Forge Disc: This is the main metal component of a beyblade that adds weight and directs how the weight is distributed as the top spins. Disc Frames (Plastic circular accessories for the Forge Discs) can also be added for various purposes.

The Driver: This is the performance tip of a beyblade that will control how it moves in the stadium, as well as influence how long the bey can spin for. the top of the driver has a spring that presses through the disc and locks into the layer, and for Takara Tomy some of these springs are red, which indicates a Dash (') version that uses a stronger spring to increase tightness.

As the game has developed over time, more features have been implemented to improve performance and quality of the beys, such as adding more metal for weight and satisfying contact or expanding the layer into different parts so that there is more room for customization. Once you have assembled a bey that suits you, it's time to prep for battle!

The rules of the game are still simple, so those who have played with older generations should find it a bit easier to get into.

Once you and your opponent have assembled your beyblade(s), attach them to your launcher. 


First, if your launcher has a separate cord, insert that before attaching the bey so it will remain on the launcher. 

Insert the prongs of the launcher into the slots on the layer of the bey, hooking it to the launcher by twisting the bey until you feel resistance from the launcher (If it's spins clockwise, twist it counterclockwise and vice versa). When doing this try to avoid twisting it to the point where you hear a cranking noise from the launcher, as this means the gears are moving past the point of comfort and can result in the launcher breaking.  

Next, pick a spot over the stadium where you wan to launch, and aim by holding the launcher over the stadium. The closer you are, the easier it is to launch. 

Lastly, countdown before you both launch your beys at the same time into the stadium with:

3-2-1, GO SHOOT!/LET IT RIP!


Now that your beys have been launched, watch the battle until a winner is determined with one of these three win conditions: 

Spin/Survivor Finish: Your opponent's bey has stopped spinning in the stadium before your own.
 (1 Point)

Over/Ring-out Finish: Your opponent's bey is knocked out of the stadium either before your own, or while your own bey remains in the stadium.
(1 Point)

Burst Finish: The lock mechanism of your opponent's bey fully comes undone, causing the bey to "burst" into separate parts.
(2 Points)

Decide how many points you and your opponent will be playing to, or make it a best-of match.

Here's a link to the WBO's Video Guide the Burst System to further help explain, and I also recommend checking out the WBO site for more help:

Video: https://www.youtube.com/watch?v=RJpVCEijVhA&t=252s

World Beyblade Organization: https://worldbeyblade.org/
Hopefully this helps as an introduction to the Burst System. Continue to have fun and let it rip!

Friday, October 11, 2019

Intro to Beysics


Alright, bladers welcome to Beysics. My name's Inferno and I'll be your guide on this site. Fairly new to blogging though I've enjoyed Beyblades from 2008 onwards, my favorite line of beys being the Metal Fight series, though on the blog I'll be mainly using Beyblade Burst when discussing any topics as they are the current incarnation. As the title would suggest, I want to return to the basics and at least start by discussing introductory topics related to Beyblade. I hope that this will help new players who need some help understanding more about the game, as well as veterans who may want to brush up, providing most of the info needed in one place.


In general, I'll be going over things like the basic rules of the game, Beyblade types, and launch techniques. I do want this to serve as more of a casual guide into the game, so I won't write competitive blogs like discussing counters to Beyblade combos or looks at the world tournament, though I may feature various Beyblade combos or parts when I'm discussing certain types of Beyblades. I'll also be happy to have discussions or receive feedback in the comments as I'm still learning about various things in the game and more specifically learning about the Beyblade Burst Franchise. But the input that's given will also help me to figure out where to go with this blog in the future, so if there's anything you like to ask or chat about in relation to that feel free to do so.


Continuing my introduction, in 2008 I got into Bakuten Shoot Beyblade via following the anime before playing the game with friends at school, and then quickly got into Metal Fight, which I played up still I stopped around the start of Zero-G in 2013. I continued to follow the anime and spin-offs for a while but hadn't played the game again until earlier this year, which got me thinking about making this blog. I'm not an expert on the game by any means, but I feel I have enough experience to provide some info that can help bladers get a better handle of the game. So with that in mind, I'll be giving this a shot and see how the blog goes, looking to have fun seeing where this path takes me. Hopefully people will take somethings away from the blog, though I'm expecting a trial and error process on my end. Nice to meet you and I hope you like some of the articles here!

3-2-1, GO SHOOT!
           LET IT RIP!